Tuesday, April 28, 2015

Analyzing the application code by using the sonarqube ANT/MAVEN


SonarQube™ software (previously known as “Sonar”) is an open source project hosted at Codehaus. By using this we can analyze the source code, its very easy to configure and use.


1. Download and unzip the SonarQube distribution ("C:\sonarqube" or "/etc/sonarqube")

2. Start the SonarQube server: under bin folder run the executable file according to respective OS.

sonarqube/bin/[OS]

3.Browse the results at http://localhost:9000

we will use Embedded database for learning.

under sonarqube/conf/sonar.properties will have the db base configuration, default it uses embeded db H2 which is in build in java.

Application level ANT configuration :


Download the sonar-ant-task jar file download

copy the jar file to /lib folder

add following to existing build.xml file of the application.

<taskdef uri="antlib:org.sonar.ant" resource="org/sonar/ant/antlib.xml">
    <classpath path="path/to/sonar-ant-task-*.jar" />
</taskdef>

if you don't want to modify the existing build.xml file then use below xml file and run "ant -f analyze-code.xml"


after the successful execution it will provide the url to access the result.


for maven application it simple run the following command

mvn clean install sonar:sonar


sample result page :


web service client JAXWS by maven

Generate web service client stub class by using the JAXWS maven plugin.

"jaxws-maven-plugin" will generate the web service stub classes by using that we can implement client or test the web service.


generated stub classes will stored under src folder and by using this service classes we can communicate with service and get the response.

for free webservice for the learning and client implementation visit xmethod.com

take any service and generate the client stub classes.


add the WSDL URL in the pom.xml

<wsdlUrls>
     <wsdlUrl>                            
    enter the wsdl URL here
     </wsdlUrl>
</wsdlUrls>


full sample :


Tuesday, April 14, 2015

JMETER load testing by code/ JMETER API implementation sample by java code

This tutorial attempts to explain the basic design, functionality and usage of the Jmeter, Jmeter is excellent tool used to perform load testing on the application, By using the jmeter GUI we can create the test samples for the request
according to our requirement and execute the samples with load of number of users.
As jmeter tool is fully developed by using JAVA, We can write the java code to do the same without using the GUI of the jmeter, Its not advisable to implement the java code for the load testing, its just a proof of concept to write the samples by java code using the jmeter libraries.
Jmeter as very good documentation/APIs, After going through the jmeter source code and other reference resources, wrote the following sample code.

Pre-prerequisites:


Prior to understand following code we must have basic knowledge of the how jmeter works.
Initially we need load the jmeter properties which will be used by jmeter classes/libraries in later stage of code
//JMeter Engine
StandardJMeterEngine jmeter = new StandardJMeterEngine();
//JMeter initialization (properties, log levels, locale, etc)
JMeterUtils.setJMeterHome(jmeterHome.getPath());
JMeterUtils.loadJMeterProperties(jmeterProperties.getPath());
JMeterUtils.initLogging();// you can comment this line out to see extra log messages of i.e. DEBUG level
JMeterUtils.initLocale();

1. Create "Test Plan" Object and JOrphan HashTree

//JMeter Test Plan, basically JOrphan HashTree
HashTree testPlanTree = new HashTree();
// Test Plan
TestPlan testPlan = new TestPlan("Create JMeter Script From Java Code");
testPlan.setProperty(TestElement.TEST_CLASS, TestPlan.class.getName());
testPlan.setProperty(TestElement.GUI_CLASS, TestPlanGui.class.getName());
testPlan.setUserDefinedVariables((Arguments) new ArgumentsPanel().createTestElement());

2. Samplers : Add "Http Sample" Object

Samplers tell JMeter to send requests to a server and wait for a response. They are processed in the order they appear in the tree. Controllers can be used to modify the number of repetitions of a sampler
// First HTTP Sampler - open uttesh.com
HTTPSamplerProxy examplecomSampler = new HTTPSamplerProxy();
examplecomSampler.setDomain("uttesh.com");
examplecomSampler.setPort(80);
examplecomSampler.setPath("/");
examplecomSampler.setMethod("GET");
examplecomSampler.setName("Open uttesh.com");
examplecomSampler.setProperty(TestElement.TEST_CLASS, HTTPSamplerProxy.class.getName());
examplecomSampler.setProperty(TestElement.GUI_CLASS, HttpTestSampleGui.class.getName());

3.Loop Controller

Loop Controller will execute the samples number times the loop iteration is declared.
// Loop Controller
LoopController loopController = new LoopController();
loopController.setLoops(1);
loopController.setFirst(true);
loopController.setProperty(TestElement.TEST_CLASS, LoopController.class.getName());
loopController.setProperty(TestElement.GUI_CLASS, LoopControlPanel.class.getName());
loopController.initialize();

4.Thread Group

Thread group elements are the beginning points of any test plan. All controllers and samplers must be under a thread group. Other elements, e.g. Listeners, may be placed directly under the test plan, in which case they will apply to all the thread groups. As the name implies, the thread group element controls the number of threads JMeter will use to execute your test.

// Thread Group
ThreadGroup threadGroup = new ThreadGroup();
threadGroup.setName("Sample Thread Group");
threadGroup.setNumThreads(1);
threadGroup.setRampUp(1);
threadGroup.setSamplerController(loopController);
threadGroup.setProperty(TestElement.TEST_CLASS, ThreadGroup.class.getName());
threadGroup.setProperty(TestElement.GUI_CLASS, ThreadGroupGui.class.getName());

5. Add sampler,controller..etc to test plan

// Construct Test Plan from previously initialized elements
testPlanTree.add(testPlan);
HashTree threadGroupHashTree = testPlanTree.add(testPlan, threadGroup);
threadGroupHashTree.add(examplecomSampler);
// save generated test plan to JMeter's .jmx file format
SaveService.saveTree(testPlanTree, new FileOutputStream("report\\jmeter_api_sample.jmx"));
above code will generate the jmeter script which we wrote from the code.

5. Add Summary and reports

//add Summarizer output to get test progress in stdout like:
// summary =      2 in   1.3s =    1.5/s Avg:   631 Min:   290 Max:   973 Err:     0 (0.00%)
Summariser summer = null;
String summariserName = JMeterUtils.getPropDefault("summariser.name", "summary");
if (summariserName.length() > 0) {
    summer = new Summariser(summariserName);
}
// Store execution results into a .jtl file, we can save file as csv also
String reportFile = "report\\report.jtl";
String csvFile = "report\\report.csv";
ResultCollector logger = new ResultCollector(summer);
logger.setFilename(reportFile);
ResultCollector csvlogger = new ResultCollector(summer);
csvlogger.setFilename(csvFile);
testPlanTree.add(testPlanTree.getArray()[0], logger);
testPlanTree.add(testPlanTree.getArray()[0], csvlogger);

Finally Execute the test

// Run Test Plan
jmeter.configure(testPlanTree);
jmeter.run();

System.out.println("Test completed. See " + jmeterHome + slash + "report.jtl file for results");
System.out.println("JMeter .jmx script is available at " + jmeterHome + slash + "jmeter_api_sample.jmx");
System.exit(0);

Full Source Code of the POC is available on the GitHub click here
Simple source :

Generate JMX sample file by code and opened in jmeter UI.
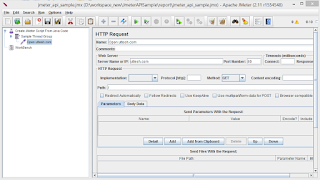
Summary Report generated by code after test execution

Wednesday, April 8, 2015

get byte or memory size of array,list,collections in java

In java lot of time we will come across the scenerio where in which we need to find the how much memory used by given list.

The ArrayList holds a pointer to a single Object array, which grows as the number of elements exceed the size of the array. The ArrayList's underlying Object array grows by about 50% whenever we run out of space.

ArrayList also writes out the size of the underlying array, used to recreate an identical ArrayList to what was serialized.

sample code to get the memory size the collection in bytes


Monday, March 30, 2015

Generate the bar code image by itext

We can generate a bar code image by using the itext jar.

Itext jar : http://sourceforge.net/projects/itext/

Download jar : http://sourceforge.net/projects/itext/files/latest/download


sample code

import com.itextpdf.text.pdf.BarcodePDF417;
import java.awt.Color;
import java.awt.image.BufferedImage;
import java.io.ByteArrayOutputStream;
import java.io.FileOutputStream;
import java.io.IOException;
import javax.imageio.ImageIO;

/**
 *
 * @author Uttesh Kumar T.H.
 */
public class GenerateBarCodeImage {
    public static void main(String[] args) throws IOException {
        BarcodePDF417 barcode = new BarcodePDF417();
        barcode.setText("Bla bla");
        java.awt.Image img = barcode.createAwtImage(Color.BLACK, Color.WHITE);
        BufferedImage outImage = new BufferedImage(img.getWidth(null), img.getHeight(null), BufferedImage.TYPE_INT_RGB);
        outImage.getGraphics().drawImage(img, 0, 0, null);
        ByteArrayOutputStream bytesOut = new ByteArrayOutputStream();
        ImageIO.write(outImage, "png", bytesOut);
        bytesOut.flush();
        byte[] pngImageData = bytesOut.toByteArray();
        FileOutputStream fos = new FileOutputStream("barcode.png");
        fos.write(pngImageData);
        fos.flush();
        fos.close();
    }
}

Regular expression to extract the src tag details from given image tag or html source text


By using the regular expression we can extract the any data from the given input, here we are trying to get the src attribute value from the given image tag or html text data.

Image 'src' attribute extract Regx:

<img[^>]*src=[\\\"']([^\\\"^']*)


sample code:

import java.util.regex.Matcher;
import java.util.regex.Pattern;

/**
 *
 * @author Uttesh Kumar T.H.
 */
public class ImgTest {

    public static void main(String[] args) {

        String s = "<p><img src=\"38220.png\" alt=\"test\" title=\"test\" /> <img src=\"32222.png\" alt=\"test\" title=\"test\" /></p>";
        Pattern p = Pattern.compile("<img[^>]*src=[\\\"']([^\\\"^']*)");
        Matcher m = p.matcher(s);
        while (m.find()) {
            String src = m.group();
            int startIndex = src.indexOf("src=") + 5;
            String srcTag = src.substring(startIndex, src.length());
            System.out.println(srcTag);
        }
    }

}


Compare images are same by java

We can compare the given images are same or not by comparing the buffer data of the image.

1. Compare the image sizes are same or not.
2. Compare the binary data of two images are same or not.

sample code :

import java.awt.image.BufferedImage;
import java.awt.image.DataBuffer;
import java.io.File;
import javax.imageio.ImageIO;

/**
 *
 * @author Uttesh Kumar T.H.
 */
public class compareimage {

    public static boolean compareImage(File fileA, File fileB) {
        try {
            // take buffer data from botm image files //
            BufferedImage biA = ImageIO.read(fileA);
            DataBuffer dbA = biA.getData().getDataBuffer();
            int sizeA = dbA.getSize();
            BufferedImage biB = ImageIO.read(fileB);
            DataBuffer dbB = biB.getData().getDataBuffer();
            int sizeB = dbB.getSize();
            // compare data-buffer objects //
            if (sizeA == sizeB) {
                for (int i = 0; i < sizeA; i++) {
                    if (dbA.getElem(i) != dbB.getElem(i)) {
                        return false;
                    }
                }
                return true;
            } else {
                return false;
            }
        } catch (Exception e) {
            System.out.println("Failed to compare image files ...");
            return false;
        }
    }

    public static void main(String[] args) {
        File file1 = new File("path to image1");
        File file2 = new File("path to image2");
        System.out.println("result :" + compareImage(file1, file2));
    }
}

Saturday, March 28, 2015

Reverse elements in Array

Reverse all elements in array, traditional way how we use to do is get the array and iterate through the for loop and use swap logic to move to temporary array and get the result.

But from > jdk 1.5 introduced reverse() in java.util.Collections which will reverse the order of the elements, all we have to do is to convert the array to arraylist by using Arrays.asList() and using collections.reverse() to reverse the order of the element.

import java.util.Arrays;
import java.util.Collections;
import java.util.List;

/**
 *
 * @author Uttesh Kumar T.H.
 */
public class ReverseArray {

    public static void main(String[] args) {
        Integer[] numbers = new Integer[]{1, 2, 3, 4, 5, 6};
        List numberlist = Arrays.asList(numbers);
        Collections.reverse(numberlist);
        for (int i = 0; i < numberlist.size(); i++) {
            System.out.println(numberlist.get(i));
        }

        // logical way of doing , its always good to understand the logic 
        int[] _numbers = {1, 2, 3, 4, 5, 6};
        for (int i = 0; i < _numbers.length / 2; i++) {
            int temp = _numbers[i]; // swap numbers 
            _numbers[i] = _numbers[_numbers.length - 1 - i];
            _numbers[_numbers.length - 1 - i] = temp;
        }
        System.out.println("reversed array : " + Arrays.toString(_numbers));
    }
}


find character uppercase/lowercase count from given text

Find the character upper/lower case occurrence count with simple single line code without iteration in java.

int counta = text.split("(?=[a])").length - 1;

This simple code will find all the lowercase character 'a' from the given text, change the regx for the uppercase . ex 'A'.

sample test code

/**
 *
 * @author Uttesh Kumar T.H.
 */
public class Countchar {

    public static void main(String[] args) {
        String text = "asfasfzxph adsa wetw";
        int counta = text.split("(?=[a])").length - 1;
        System.out.println("count a : "+counta);
        

    }
}


Monday, March 23, 2015

Thursday, March 19, 2015

Jfreechart servelt example


Prerequisites

  • JDK 1.5 and above
  • Jfreechart jar
  • mysql connector jar

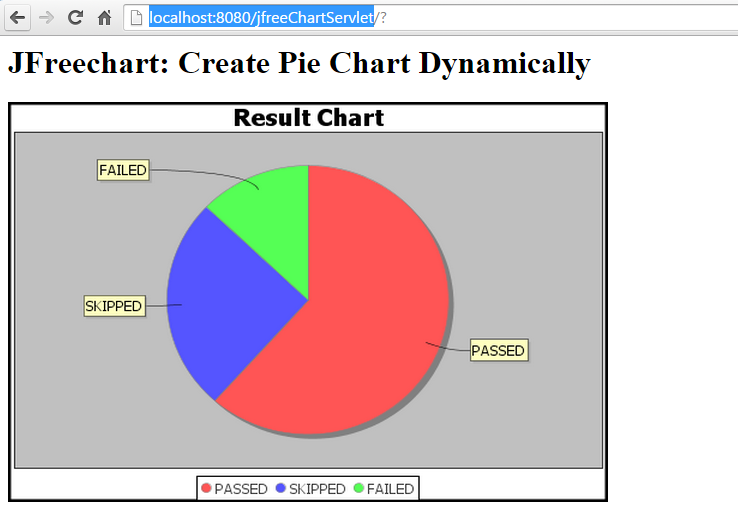
To generate charts we can use jfrecharts which is open source and free. In this example i will show how to generate the jfreechart dynamically for every 5 seconds getting data from the database.

Full source code : github link

sample :
Create Simple servlet :

import java.awt.BasicStroke;
import java.awt.Color;
import java.io.IOException;
import java.io.OutputStream;
import java.sql.*;
import java.sql.Connection;
import java.sql.DriverManager;
import java.sql.SQLException;
import java.util.ArrayList;
import javax.servlet.ServletException;
import javax.servlet.http.HttpServlet;
import javax.servlet.http.HttpServletRequest;
import javax.servlet.http.HttpServletResponse;
import org.jfree.chart.ChartFactory;
import org.jfree.chart.ChartRenderingInfo;
import org.jfree.chart.ChartUtilities;
import org.jfree.chart.JFreeChart;
import org.jfree.chart.entity.StandardEntityCollection;
import org.jfree.data.jdbc.JDBCPieDataset;

public class JfreeChartServlet extends HttpServlet {
    
        private static Connection connection = null;

    protected void doGet(HttpServletRequest request, HttpServletResponse response) throws ServletException, IOException {
        
        try {
            JDBCPieDataset dataset = new JDBCPieDataset(getConnection());
            dataset.executeQuery("select * from result");
            JFreeChart chart = ChartFactory.createPieChart("Result Chart", dataset, true, true, false);
            chart.setBorderPaint(Color.black);
            chart.setBorderStroke(new BasicStroke(4.0f));
            chart.setBorderVisible(true);
            if (chart != null) {
                int width = 500;
                int height = 350;
                final ChartRenderingInfo info = new ChartRenderingInfo(new StandardEntityCollection());
                response.setContentType("image/png");
                OutputStream out = response.getOutputStream();
                ChartUtilities.writeChartAsPNG(out, chart, width, height, info);
            }
        } catch (SQLException e) {
            e.printStackTrace();
        }
    }

    
    public static Connection getConnection() {
        if (connection != null)
            return connection;
        else {
            try {
                String driver = "com.mysql.jdbc.Driver";
                String url = "jdbc:mysql://localhost:3306/test";
                String user = "root";
                String password = "******";
                Class.forName(driver);
                connection = DriverManager.getConnection(url, user, password);
            } catch (ClassNotFoundException e) {
                e.printStackTrace();
            } catch (SQLException e) {
                e.printStackTrace();
            } 
            return connection;
        }

    }
    
    public static ArrayList<Result> getData() {
     connection = getConnection();
        ArrayList<Result> resultList = new ArrayList<Result>();
        try {
            Statement statement = connection.createStatement();
            ResultSet rs = statement.executeQuery("select * from result");
        
            while(rs.next()) { 
             Result result=new Result();
             result.setStatus(rs.getString("status"));
             result.setCount(rs.getInt("count"));
             resultList.add(result);
            }
        } catch (SQLException e) {
            e.printStackTrace();
        }

        return resultList;
    }
}


jfreechartSample.jsp :

<html>
<head>
<meta http-equiv="Content-Type" content="text/html; charset=ISO-8859-1">
<title>Pie Chart Demo</title>
<script language="Javascript">
function refreshpage(){
document.forms.form1.submit();
}
</script>
</head>
<body>
<h1>Pie Chart</h1>
<%response.setIntHeader("Refresh",5);%>
<form id="form1">
  <img src="chart" width="600" height="400" border="0"/>
<!--  <input type="button" onclick="refreshpage()" value="Refresh"/>-->
</form>
</body>
</html>

web.xml:

<?xml version="1.0" encoding="UTF-8"?>
<web-app version="2.5" 
 xmlns="http://java.sun.com/xml/ns/javaee" 
 xmlns:xsi="http://www.w3.org/2001/XMLSchema-instance" 
 xsi:schemaLocation="http://java.sun.com/xml/ns/javaee 
 http://java.sun.com/xml/ns/javaee/web-app_2_5.xsd">
  <servlet>
    <servlet-name>JfreeChartServlet</servlet-name>
    <servlet-class>JfreeChartServlet</servlet-class>
  </servlet>

  <servlet-mapping>
    <servlet-name>JfreeChartServlet</servlet-name>
    <url-pattern>/chart</url-pattern>
  </servlet-mapping>
  <welcome-file-list>
    <welcome-file>jfreechartSample.jsp</welcome-file>
  </welcome-file-list>
</web-app>

Database scripts: create the following table and insert the sample data.

CREATE TABLE `result` (
  `status` varchar(20) DEFAULT NULL,
  `count` int(11) DEFAULT NULL
);

INSERT INTO result(
   status
  ,count
) VALUES (
   'PASSED'  -- status - IN varchar(20)
  ,25   -- count - IN int(11)
);

INSERT INTO result(
   status
  ,count
) VALUES (
   'FAILED'  -- status - IN varchar(20)
  ,40   -- count - IN int(11)
);

INSERT INTO result(
   status
  ,count
) VALUES (
   'SKIPPED'  -- status - IN varchar(20)
  ,10   -- count - IN int(11)
)

Tuesday, March 3, 2015

Generate PDF report for selenium/testng test cases.

Use Open source pdfngreport plugin to generate the pdf report for the selenium/testng test cases execution.

It's Opensource and in maven repository

<dependency>
        <groupId>com.uttesh</groupId>
        <artifactId>pdfngreport</artifactId>
        <version>2.0.3</version>
</dependency>

Official WebPage http://uttesh.github.io/pdfngreport/

Pdf report will have chart shows how many test cases passed/failed/skipped.


Status table which shows full detail status of each test cases.


Exception summary of failed test cases.

Monday, March 2, 2015

5 Step to host static website/Project Pages site on github


5 Steps to host a static page or project page on github

  1. Create Github account and verify the email id
  2. Add your repository/project to github
  3. Create static pages for you application
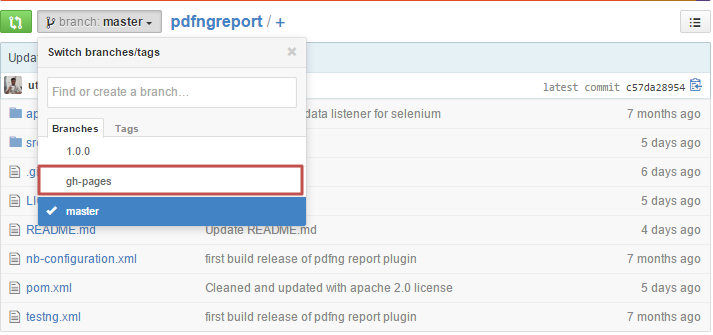
  4. Create gh-page branch
  5. Live the pages

Create Github account and verify the email id

Create the github accound from github.com and verify email address.

Add your repository/project to github

Install git client in the respective box and upload the project to github

Create static pages for your application/profile

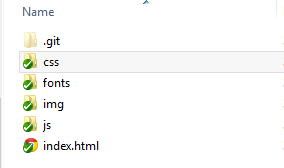
Create the static pages your repository, it takes all js/css/images folders also.


Create gh-page branch

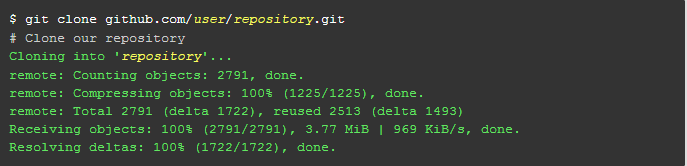
Make a fresh clone


To set up a Project Pages site, you need to create a new "orphan" branch (a branch that has no common history with an existing branch) in your repository. The safest way to do this is to start with a fresh clone:


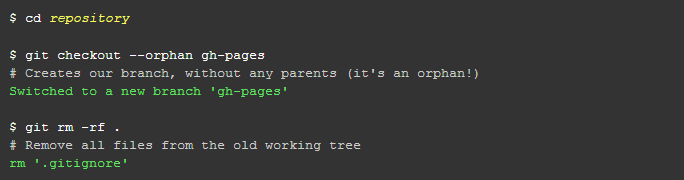
Create a gh-pages branch

Once you have a clean repository, you'll need to create the new gh-pages branch and remove all content from the working directory and index.


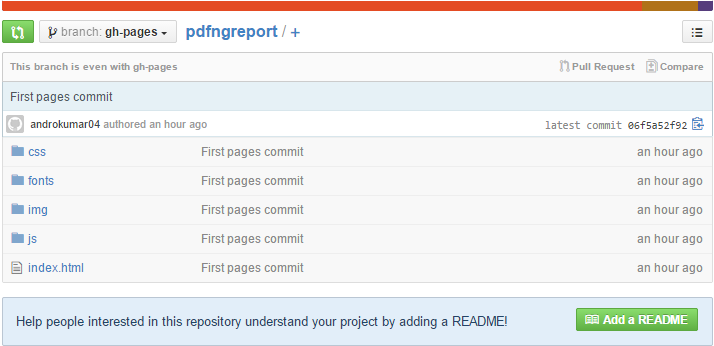
Add content and push
Now you have an empty working directory. You can create some content in this branch and push it to GitHub.push all static pages and relates files.

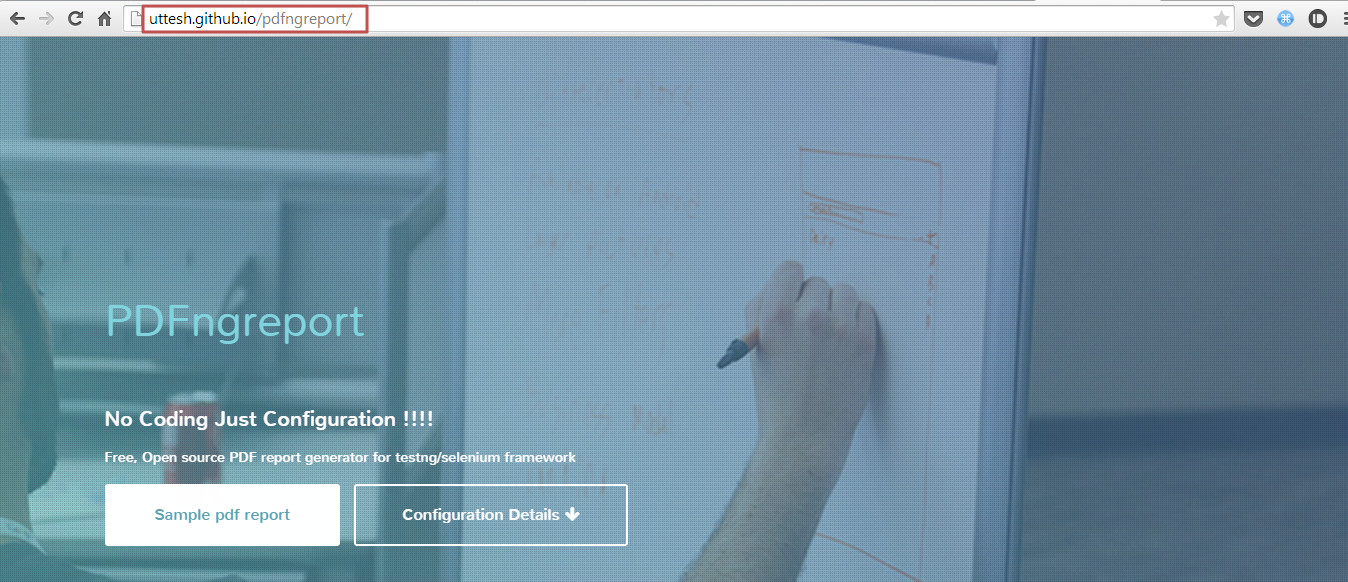
Load your new GitHub Pages site!!!!

After your push to the gh-pages branch, your Project Pages site will be available at http(s)://.github.io/. Note that Pages are always publicly accessible when published, even if their repository is private.

You con configure you domain to this.

I followed all the steps and created pages for my open source project have look for reference.


for reference see full sample code https://github.com/uttesh/pdfngreport/tree/gh-pages
live demo http://uttesh.github.io/pdfngreport/

Generate PDF page as image

We can generate the image of pdf page by using the Pdf-renderer

Simple class which generate the images file of given pdf file.

/*
 * To change this license header, choose License Headers in Project Properties.
 * To change this template file, choose Tools | Templates
 * and open the template in the editor.
 */
package mayan.pdf;

/**
 *
 * @author Uttesh Kumar T.H.
 */
import com.sun.pdfview.PDFFile;
import com.sun.pdfview.PDFPage;
import java.awt.Graphics;
import java.awt.GraphicsConfiguration;
import java.awt.GraphicsDevice;
import java.awt.GraphicsEnvironment;
import java.awt.HeadlessException;
import java.awt.Image;
import java.awt.Rectangle;
import java.awt.Transparency;
import java.awt.image.*;
import java.io.*;
import java.nio.ByteBuffer;
import java.nio.channels.FileChannel;
import javax.imageio.*;
import javax.swing.*;

public class PdfPageImageGenerator {

    public static void ImageGenerator() throws IOException {
        // load a pdf from a byte buffer
        File file = new File("sample.pdf");
        RandomAccessFile raf = new RandomAccessFile(file, "r");
        FileChannel channel = raf.getChannel();
        ByteBuffer buf = channel.map(FileChannel.MapMode.READ_ONLY, 0, channel.size());
        PDFFile pdffile = new PDFFile(buf);
        int numPgs = pdffile.getNumPages();
        for (int i = 0; i < numPgs; i++) {
            PDFPage page = pdffile.getPage(i);
            Rectangle rect = new Rectangle(0, 0, (int) page.getBBox().getWidth(), (int) page.getBBox().getHeight());
            Image img = page.getImage(rect.width, rect.height, rect, null, true, true);
            BufferedImage bImg = toBufferedImage(img);
            File yourImageFile = new File("pics\\page_" + i + ".png");
            ImageIO.write(bImg, "png", yourImageFile);
        }
    }

    public static BufferedImage toBufferedImage(Image image) {
        if (image instanceof BufferedImage) {
            return (BufferedImage) image;
        }
        image = new ImageIcon(image).getImage();
        boolean hasAlpha = hasAlpha(image);
        BufferedImage bimage = null;
        GraphicsEnvironment ge = GraphicsEnvironment.getLocalGraphicsEnvironment();
        try {
            int transparency = Transparency.OPAQUE;
            if (hasAlpha) {
                transparency = Transparency.BITMASK;
            }
            GraphicsDevice gs = ge.getDefaultScreenDevice();
            GraphicsConfiguration gc = gs.getDefaultConfiguration();
            bimage = gc.createCompatibleImage(image.getWidth(null), image.getHeight(null), transparency);
        } catch (HeadlessException e) {
        }
        if (bimage == null) {
            int type = BufferedImage.TYPE_INT_RGB;
            if (hasAlpha) {
                type = BufferedImage.TYPE_INT_ARGB;
            }
            bimage = new BufferedImage(image.getWidth(null), image.getHeight(null), type);
        }
        Graphics g = bimage.createGraphics();
        // Paint the image onto the buffered image
        g.drawImage(image, 0, 0, null);
        g.dispose();
        return bimage;
    }

    public static boolean hasAlpha(Image image) {
        if (image instanceof BufferedImage) {
            BufferedImage bimage = (BufferedImage) image;
            return bimage.getColorModel().hasAlpha();
        }
        PixelGrabber pg = new PixelGrabber(image, 0, 0, 1, 1, false);
        try {
            pg.grabPixels();
        } catch (InterruptedException e) {
        }
        ColorModel cm = pg.getColorModel();
        return cm.hasAlpha();
    }

    public static void main(final String[] args) {
        new Runnable() {
            public void run() {
                try {
                    PdfPageImageGenerator.ImageGenerator();
                } catch (IOException ex) {
                    ex.printStackTrace();
                }
            }
        }.run();
    }
}


formatted view of above code