This tutorial attempts to explain the basic design, functionality and usage of the Jmeter, Jmeter is excellent tool used to perform load testing on the application, By using the jmeter GUI we can create the test samples for the request
according to our requirement and execute the samples with load of number of users.
As jmeter tool is fully developed by using JAVA, We can write the java code to do the same without using the GUI of the jmeter, Its not advisable to implement the java code for the load testing, its just a proof of concept to write the samples by java code using the jmeter libraries.
Jmeter as very good documentation/APIs, After going through the jmeter source code and other reference resources, wrote the following sample code.
Prior to understand following code we must have basic knowledge of the how jmeter works.
Initially we need load the jmeter properties which will be used by jmeter classes/libraries in later stage of code
above code will generate the jmeter script which we wrote from the code.
Full Source Code of the POC is available on the GitHub click here
Simple source :
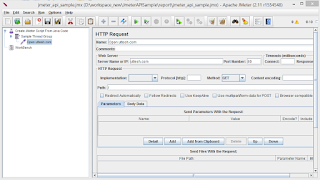
Generate JMX sample file by code and opened in jmeter UI.
Summary Report generated by code after test execution

according to our requirement and execute the samples with load of number of users.
As jmeter tool is fully developed by using JAVA, We can write the java code to do the same without using the GUI of the jmeter, Its not advisable to implement the java code for the load testing, its just a proof of concept to write the samples by java code using the jmeter libraries.
Jmeter as very good documentation/APIs, After going through the jmeter source code and other reference resources, wrote the following sample code.
Pre-prerequisites:
Prior to understand following code we must have basic knowledge of the how jmeter works.
Initially we need load the jmeter properties which will be used by jmeter classes/libraries in later stage of code
//JMeter Engine
StandardJMeterEngine jmeter = new StandardJMeterEngine();
//JMeter initialization (properties, log levels, locale, etc)
JMeterUtils.setJMeterHome(jmeterHome.getPath());
JMeterUtils.loadJMeterProperties(jmeterProperties.getPath());
JMeterUtils.initLogging();// you can comment this line out to see extra log messages of i.e. DEBUG level
JMeterUtils.initLocale();
1. Create "Test Plan" Object and JOrphan HashTree
//JMeter Test Plan, basically JOrphan HashTree
HashTree testPlanTree = new HashTree();
// Test Plan
TestPlan testPlan = new TestPlan("Create JMeter Script From Java Code");
testPlan.setProperty(TestElement.TEST_CLASS, TestPlan.class.getName());
testPlan.setProperty(TestElement.GUI_CLASS, TestPlanGui.class.getName());
testPlan.setUserDefinedVariables((Arguments) new ArgumentsPanel().createTestElement());
2. Samplers : Add "Http Sample" Object
Samplers tell JMeter to send requests to a server and wait for a response. They are processed in the order they appear in the tree. Controllers can be used to modify the number of repetitions of a sampler// First HTTP Sampler - open uttesh.com HTTPSamplerProxy examplecomSampler = new HTTPSamplerProxy(); examplecomSampler.setDomain("uttesh.com"); examplecomSampler.setPort(80); examplecomSampler.setPath("/"); examplecomSampler.setMethod("GET"); examplecomSampler.setName("Open uttesh.com"); examplecomSampler.setProperty(TestElement.TEST_CLASS, HTTPSamplerProxy.class.getName()); examplecomSampler.setProperty(TestElement.GUI_CLASS, HttpTestSampleGui.class.getName());
3.Loop Controller
Loop Controller will execute the samples number times the loop iteration is declared.// Loop Controller LoopController loopController = new LoopController(); loopController.setLoops(1); loopController.setFirst(true); loopController.setProperty(TestElement.TEST_CLASS, LoopController.class.getName()); loopController.setProperty(TestElement.GUI_CLASS, LoopControlPanel.class.getName()); loopController.initialize();
4.Thread Group
Thread group elements are the beginning points of any test plan. All controllers and samplers must be under a thread group. Other elements, e.g. Listeners, may be placed directly under the test plan, in which case they will apply to all the thread groups. As the name implies, the thread group element controls the number of threads JMeter will use to execute your test.// Thread Group ThreadGroup threadGroup = new ThreadGroup(); threadGroup.setName("Sample Thread Group"); threadGroup.setNumThreads(1); threadGroup.setRampUp(1); threadGroup.setSamplerController(loopController); threadGroup.setProperty(TestElement.TEST_CLASS, ThreadGroup.class.getName()); threadGroup.setProperty(TestElement.GUI_CLASS, ThreadGroupGui.class.getName());
5. Add sampler,controller..etc to test plan
// Construct Test Plan from previously initialized elements
testPlanTree.add(testPlan);
HashTree threadGroupHashTree = testPlanTree.add(testPlan, threadGroup);
threadGroupHashTree.add(examplecomSampler);
// save generated test plan to JMeter's .jmx file format
SaveService.saveTree(testPlanTree, new FileOutputStream("report\\jmeter_api_sample.jmx"));
5. Add Summary and reports
//add Summarizer output to get test progress in stdout like:
// summary =      2 in   1.3s =    1.5/s Avg:   631 Min:   290 Max:   973 Err:     0 (0.00%)
Summariser summer = null;
String summariserName = JMeterUtils.getPropDefault("summariser.name", "summary");
if (summariserName.length() > 0) {
    summer = new Summariser(summariserName);
}
// Store execution results into a .jtl file, we can save file as csv also
String reportFile = "report\\report.jtl";
String csvFile = "report\\report.csv";
ResultCollector logger = new ResultCollector(summer);
logger.setFilename(reportFile);
ResultCollector csvlogger = new ResultCollector(summer);
csvlogger.setFilename(csvFile);
testPlanTree.add(testPlanTree.getArray()[0], logger);
testPlanTree.add(testPlanTree.getArray()[0], csvlogger);
Finally Execute the test
// Run Test Plan
jmeter.configure(testPlanTree);
jmeter.run();

System.out.println("Test completed. See " + jmeterHome + slash + "report.jtl file for results");
System.out.println("JMeter .jmx script is available at " + jmeterHome + slash + "jmeter_api_sample.jmx");
System.exit(0);
Full Source Code of the POC is available on the GitHub click here
Simple source :
Generate JMX sample file by code and opened in jmeter UI.

Summary Report generated by code after test execution


