Prerequisites:
1. Sign Up at Sonatype.
2. Create your project in JIRA.
3. Create a Key Pair.
4. Create and Sign your Artifacts.
5. Deploy your Artifacts to your Staging Repository.
6. Promote your Repository
Step #1: Sign Up at Sonatype
Sonatype is a company that provide the access point to making a project available in the Maven Central Repository. You have to create an account at the following sites (for free ;) ):
https://issues.sonatype.org/: This is Sonatypes JIRA issue management system.
https://oss.sonatype.org: This is Sonatypes Nexus installation. Nexus is a software that basically acts as a collection of Maven repositories.
Step #2: Create your project in JIRA
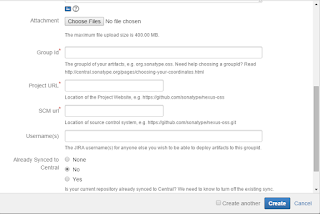
Before submitting the project we need create the jiira artifact. create an issue of type “New Project”.
Project: select “Community Support – Open Source”
Issue Type: select “New Project”
Summary: name of your project
Description: line about what your project is about
Attachment: don’t add an attachment
Group Id: your desired Maven group id (your namespace).
Project URL: URL to your project homepage. You should have a homepage for your project, even if it is just the frontpage of your github or google code repository.
SCM URL: URL to your source code management system like github or google code
Username: your JIRA user name
Already Synced to Central: choose “No”
Epic Link: leave empty


Once the jiira artifact for new project is created successfully,Sonatype developement team will usually respond within a couple hours, but it may take longer – be patient.
you will receive email with subject "[JIRA] (OSSRH-ID) you project description".
Step #3: Create a Key Pair
This step is very important proper key should be created and all file should be signed.
It is required for any artifacts you release to be signed. The easiest way to do this is by using GNU Privacy Guard.
Windows : http://www.gpg4win.de/
You will have to choose a passphrase when generating a key pair.
After installing the gpg run the following command to create the key.
1. create key
c:\gpg --gen-key
Algorithm - choose RSA and RSA
 Key size - choose 2048 bit
 Time of validity for the key, just use the default value if you don’t have any special requirements.
 Name and email
 Comment - may be empty
 Passphrase (enter and remember)
2. List your key
gpg --list-keys

D:\git\pdfngreport>gpg --list-keys
C:/Users/uttesh/AppData/Roaming/gnupg/pubring.gpg
 -------------------------------------------------
pub   2048R/D6E12C4E 2015-02-24
uid       [ultimate] uttesh (pdf ngreport opensource project) <uttesh@github.com>
3.Now you can upload your key to keyserver.
gpg --keyserver hkp://pool.sks-keyservers.net --send-keys D6E12C4E
Step#4: Create and Sign your Artifacts:
Now you can sign you artifact manually or with maven plugin.Manually:
run for signing:
$gpg -ab artifact.jar
run for verifying:
$gpg --verify artifact.jar.asc
Maven plugin: add plugin to build section:
<plugins>
            <plugin>
                <groupId>org.apache.maven.plugins</groupId>
                <artifactId>maven-gpg-plugin</artifactId>
                <version>1.4</version>
                <executions>
                    <execution>
                        <id>sign-artifacts</id>
                        <phase>verify</phase>
                        <goals>
                            <goal>sign</goal>
                        </goals>
                    </execution>
                </executions>
            </plugin>
        </plugins>
sign all the file
mvn clean javadoc:jar source:jar gpg:sign -Dgpg.passphrase=your_passphrase install
file in target folder :
project-1.0.pom
project-1.0.pom.asc
project-1.0.jar
project-1.0.jar.asc
project-1.0-sources.jar
project-1.0-sources.jar.asc
project-1.0-javadoc.jar
project-1.0-javadoc.jar.asc
Step #5:Deploy your Artifacts to your Staging Repository
If your request for a new Project in the Sonatype JIRA was successful, you will get an mail with content something like the following:
Configuration has been prepared, now you can:

Deploy snapshot artifacts into repository https://oss.sonatype.org/content/repositories/snapshots
Deploy release artifacts into the staging repository https://oss.sonatype.org/service/local/staging/deploy/maven2
Promote staged artifacts into repository ‘Releases’
Download snapshot and release artifacts from group https://oss.sonatype.org/content/groups/public
Download snapshot, release and staged artifacts from staging group https://oss.sonatype.org/content/groups/staging
please comment on this ticket when you promoted your first release, thanks
This basically means that they have provided a staging repository for you where you can upload your artifacts (automatically or manually). From this staging repository you can then manually trigger a release to Maven Central.
After the Maven build has finished successfully, log in to https://oss.sonatype.org and click the link “Staging Repositories” in the left-side navigation. In the opening tab, select your repository. This triggers some validation checks on the files you uploaded. You can see if those validations were successful by clicking on the “Activity”-tab in the bottom part of the screen and selecting the “close” node. If there were any errors, fix the errors and deploy again. A documentation of the validations that will be performed when closing a repository can be found here.
Go to https://oss.sonatype.org/, login (right top angle) with your sonatype jira account.
home page :

click "Staging Upload" from left side menu.

After the upload make sure no error in after the upload in the active tab.Once all validations were successful, you can now promote the repository by clicking the “release” button. This means that you want the contents you uploaded into this repository to be released to Maven Central. After this has been done you should receive an email with the subject “Nexus: Promotion completed” and you should add a comment to the JIRA issue you created and wait for them to activate the sync to Maven Central. This may again take one or two working days. After this, your project has been successfully released to Maven Central and you can upload and then release repositories at any time without having to wait so long (repositories that have been successfully promoted once before will automatically be synced to Maven Central about every two hours from now on).

0 comments:
Post a Comment